
eggjs
一、初始化
npm init egg --type=simple
二、目录结构
.
├── ./README.md
├── ./app
│   ├── ./app/contract
│   │   └── ./app/contract/index.js
│   │
│   ├── ./app/controller 用于解析用户的输入,处理后返回相应的结果
│   │   └── ./app/controller/demo.js
│   │
│   ├── ./app/core
│   │   ├── ./app/core/baseController.js 封装了常用的方法
│   │
│   ├── ./app/dubbo
│   │   ├── ./app/dubbo/TestService.js
│   │   └── ./app/dubbo/index.js
│   │
│   ├── ./app/middleware 用于编写中间件
│   │   └── ./app/middleware/errorHandler.js 统一错误信息配置
│   │
│   ├── ./app/model
│   │   └── ./app/model/InterviewInfo.js
│   │
│   ├── ./app/public 用于存放静态资源
│   │
│   ├── ./app/router.js 用于配置 URL 路由规则
│   │
│   ├── ./app/service 用于编写业务逻辑层
│   │   └── ./app/service/demo.js
│   │
│   └── ./app/utils
│       └── ./app/utils/common.js
│
└── ./config
    ├── ./config/config.default.js 默认的配置文件,所有环境都会加载这个配置文件
    │
    ├── ./config/config.dev.js 测试环境
    │
    ├── ./config/config.local.js 本地
    │
    ├── ./config/config.prod.js 正式环境
    │
    └── ./config/plugin.js 用于配置需要加载的插件
三、运行环境
1、本地开发env=local
使用egg-bin模块
- 安装
npm i egg-bin --save-dev
- 添加命令
添加 npm scripts 到 package.json
{
  "scripts": {
    "dev": "egg-bin dev"
  }
}
通过 npm run dev 命令启动应用。读取的配置也是 config.default.js 和 config.local.js合并的结果。
2、开发环境env=dev
config.default.js 和 config.dev.js
3、正式环境env=prod
config.default.js 和 config.prod.js️
⭐ app.config.env获取应用当前的运行环境。
四、router
用于配置 URL 路由规则
1、定义router
// app/router.js
module.exports = (app) => {
  const { router, controller } = app;
  router.get('/user/:id', controller.user.info);
};
2、参数获取
- Query String 方式
// app/router.js
module.exports = (app) => {
  app.router.get('/search', app.controller.search.index);
};


// app/controller/search.js
exports.index = async (ctx) => {
  console.log(ctx.query.name)
};

// url http://127.0.0.1:7001/search?name=egg
- 参数命名方式
// app/router.js
module.exports = (app) => {
  app.router.get('/user/:id', app.controller.user.info);
};


// app/controller/user.js
exports.info = async (ctx) => {
  console.log(ctx.params.id)
};

// url http://127.0.0.1:7001/user/123
- 表单内容的获取
// app/router.js
module.exports = (app) => {
  app.router.post('/form', app.controller.form.post);
};


// app/controller/form.js
exports.post = async (ctx) => {
  console.log(ctx.request.body)
};
3、多路由映射
// router.js
module.exports = app => {
  require('./router/classify')(app);
  require('./router/enterprise')(app);
};


// router/classify.js
module.exports = app => {
  const { router, controller } = app;
  // 分类相关功能
  router.get('/api/neiying/template/getList.do', controller.classify.getTemplate);
};


// router/enterprise.js
module.exports = app => {
  const { router, controller } = app;

  // 企业相关功能
  router.post('/api/neiying/background/add.do', controller.enterprise.add);

};
五、Controller
用于解析用户的输入,处理后返回相应的结果
1、定义
// app/controller/post.js
const Controller = require('egg').Controller;

class PostController extends Controller {
  async create() {
    // 调用 Service 进行业务处理
    const res = await service.post.create();

    this.success(res)
  }
}
module.exports = PostController;
2、属性
this.ctx: 当前请求的上下文Context对象的实例,通过它我们可以拿到框架封装好的处理当前请求的各种便捷属性和方法。this.app: 当前应用 Application 对象的实例,通过它我们可以拿到框架提供的全局对象和方法。this.service:应用定义的 Service,通过它我们可以访问到抽象出的业务层,等价于this.ctx.service。this.config:应用运行时的配置项。this.logger:logger 对象,上面有四个方法(debug,info,warn,error),分别代表打印四个不同级别的日志,使用方法和效果与 context logger 中介绍的一样,但是通过这个 logger 对象记录的日志,在日志前面会加上打印该日志的文件路径,以便快速定位日志打印位置。
3、自定义 Controller 基类
封装了常用的方法
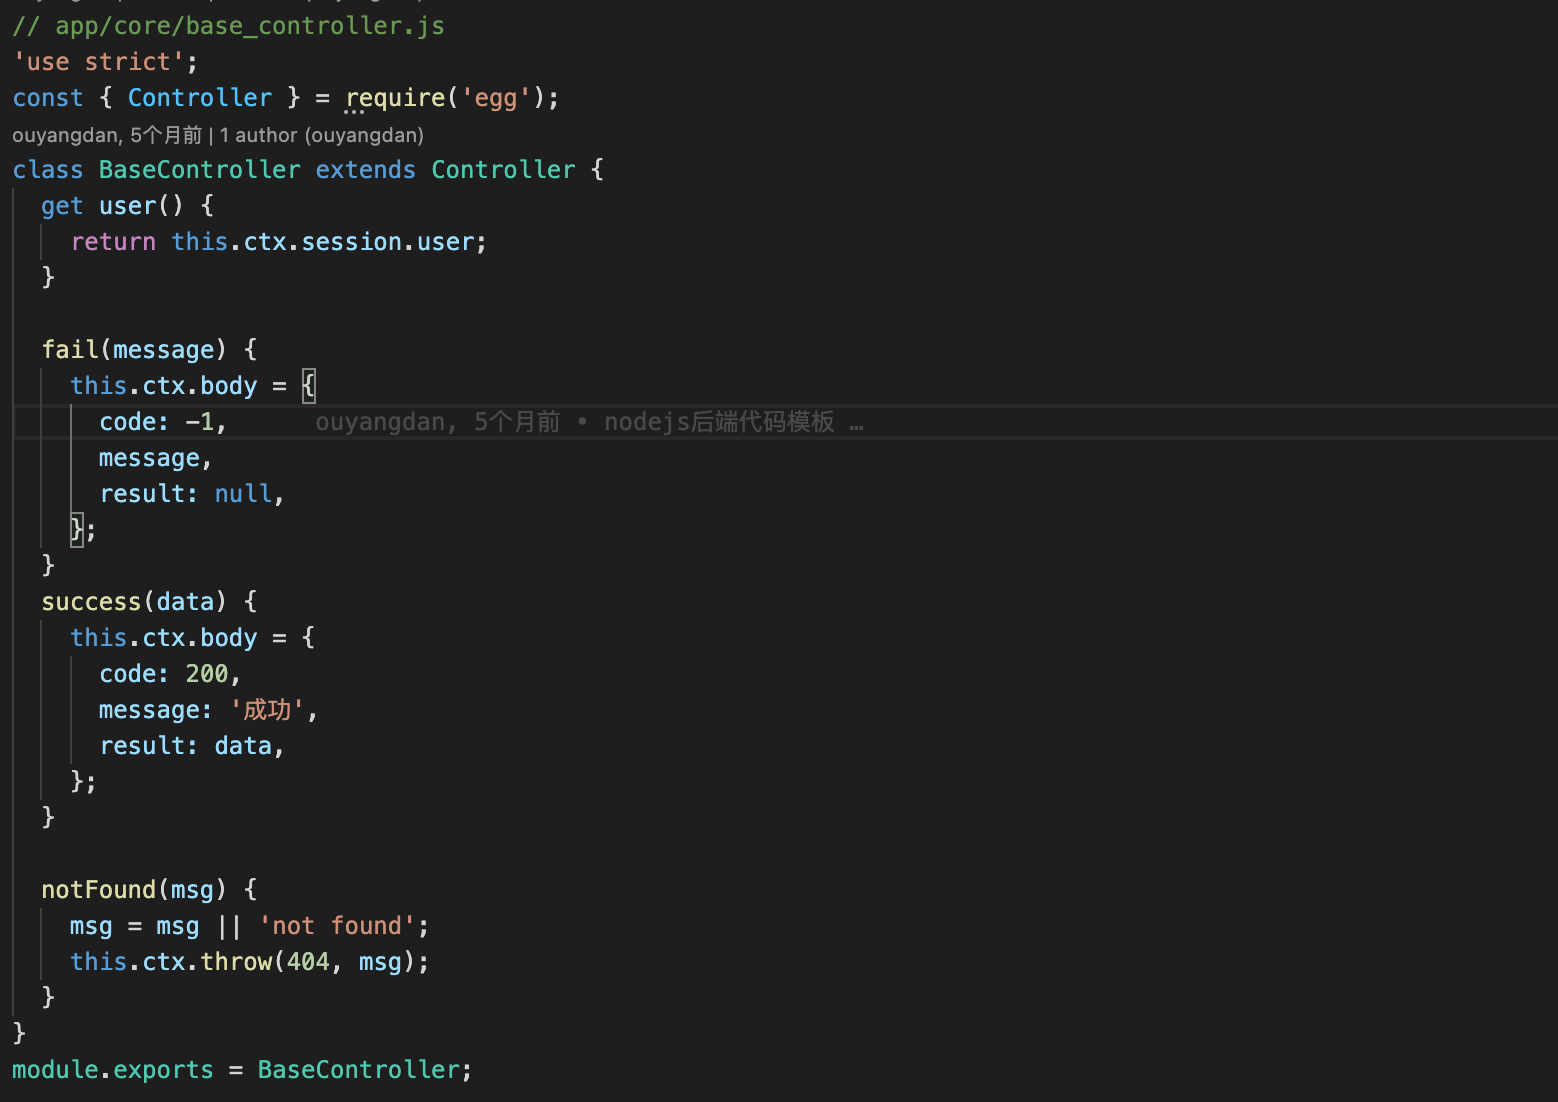
此时在编写应用的 Controller 时,可以继承 BaseController,直接使用基类上的方法:
// app.controller/xxx.js
const Controller = require('../core/baseController');

class DemoController extends Controller {

  async hello() {
    this.success('hi, egg');
  }
}
六、Service
用于做业务逻辑封装的一个抽象层
1、定义
// app/service/user.js
const Service = require('egg').Service;

class UserService extends Service {
  async find(uid) {
    const user = await this.ctx.db.query(
      'select * from user where uid = ?',
      uid,
    );
    return user;
  }
}

module.exports = UserService;
2、属性
七、中间件
1、配置
约定一个中间件是一个放置在app/middleware目录下的单独文件,它需要 exports 一个普通的 function,接受两个参数:
options: 中间件的配置项,框架会将
app.config[${middlewareName}]传递进来。app: 当前应用 Application 的实例。
2、使用
- 在应用中使用中间件
在 config.default.js 中设置中间件的开启和配置
- **enable**:控制中间件是否开启。

- **match**:设置只有符合某些规则的请求才会经过这个中间件。

- **ignore**:设置符合某些规则的请求不经过这个中间件。
⭐️ match 和 ignore 不允许同时配置
module.exports = {
  // 配置需要的中间件,数组顺序即为中间件的加载顺序
  middleware: ['errorHandler'],

  // 配置 errorHandler 中间件的配置
  errorHandler = {
    enable: true, // 中间件开启配置
    match: '', // 设置请求中间件的请求路由
    // ignore: '', // 设置不经过这个中间件的请求路由
  };
};
- router 中使用中间件
只对单个路由生效
module.exports = (app) => {

  const { router, controller, middleware } = app;
  const helloHandler = middleware.helloHandler();

  router.get('/api/neiying/template/getList.do', helloHandler, controller.classify.getTemplate);
};
八、MySQL
框架提供了 egg-mysql插件来访问 MySQL 数据库
1、安装与配置
- 安装
npm i --save egg-mysql
- 开启插件
// config/plugin.js
exports.mysql = {
  enable: true,
  package: 'egg-mysql',
};
在 config/config.${env}.js 配置各个环境的数据库连接信息。
2、单数据源
// config/config.${env}.js
exports.mysql = {
  // 单数据库信息配置
  client: {
    // host
    host: 'mysql.com',
    // 端口号
    port: '3306',
    // 用户名
    user: 'test_user',
    // 密码
    password: 'test_password',
    // 数据库名
    database: 'test',
  },
  // 是否加载到 app 上,默认开启
  app: true,
  // 是否加载到 agent 上,默认关闭
  agent: false,
};
使用方式:
await app.mysql.query(sql, values); // 单实例可以直接通过 app.mysql 访问
3、多数据源
exports.mysql = {
  clients: {
    // clientId, 获取client实例,需要通过 app.mysql.get('clientId') 获取
    db1: {
      // host
      host: 'mysql.com',
      // 端口号
      port: '3306',
      // 用户名
      user: 'test_user',
      // 密码
      password: 'test_password',
      // 数据库名
      database: 'test',
    },
    db2: {
      // host
      host: 'mysql2.com',
      // 端口号
      port: '3307',
      // 用户名
      user: 'test_user',
      // 密码
      password: 'test_password',
      // 数据库名
      database: 'test',
    },
    // ...
  },
  // 所有数据库配置的默认值
  default: {},

  // 是否加载到 app 上,默认开启
  app: true,
  // 是否加载到 agent 上,默认关闭
  agent: false,
};
使用方式:
const client1 = app.mysql.get('db1');
await client1.query(sql, values);

const client2 = app.mysql.get('db2');
await client2.query(sql, values);
4、CRUD 语句
1)Create
可以直接使用 insert 方法插入一条记录。
// 插入
const result = await this.app.mysql.insert('posts', { title: 'Hello World' }); // 在 post 表中,插入 title 为 Hello World 的记录

=> INSERT INTO `posts`(`title`) VALUES('Hello World');

console.log(result);

=>
{
  fieldCount: 0,
  affectedRows: 1,
  insertId: 3710,
  serverStatus: 2,
  warningCount: 2,
  message: '',
  protocol41: true,
  changedRows: 0
}


// 判断插入成功
const insertSuccess = result.affectedRows === 1;
2)Read
- 查询一条记录
const post = await this.app.mysql.get('posts', { id: 12 });

=> SELECT * FROM `posts` WHERE `id` = 12 LIMIT 0, 1;
- 查询全表
const results = await this.app.mysql.select('posts');

=> SELECT * FROM `posts`;
- 条件查询和结果定制
const results = await this.app.mysql.select('posts', { // 搜索 post 表
  where: { status: 'draft', author: ['author1', 'author2'] }, // WHERE 条件
  columns: ['author', 'title'], // 要查询的表字段
  orders: [['created_at','desc'], ['id','desc']], // 排序方式
  limit: 10, // 返回数据量
  offset: 0, // 数据偏移量
});

=> SELECT `author`, `title` FROM `posts`
  WHERE `status` = 'draft' AND `author` IN('author1','author2')
  ORDER BY `created_at` DESC, `id` DESC LIMIT 0, 10;
3)Update
可以直接使用 update 方法更新数据库记录。
// 修改数据,将会根据主键 ID 查找,并更新
const row = {
  id: 123,
  name: 'fengmk2',
  otherField: 'other field value',    // any other fields u want to update
  modifiedAt: this.app.mysql.literals.now, // `now()` on db server
};
const result = await this.app.mysql.update('posts', row); // 更新 posts 表中的记录

=> UPDATE `posts` SET `name` = 'fengmk2', `modifiedAt` = NOW() WHERE id = 123 ;

// 判断更新成功
const updateSuccess = result.affectedRows === 1;


// -------------------------------------------------------------------


// 如果主键是自定义的 ID 名称,如 custom_id,则需要在 `where` 里面配置
const row = {
  name: 'fengmk2',
  otherField: 'other field value',    // any other fields u want to update
  modifiedAt: this.app.mysql.literals.now, // `now()` on db server
};

const options = {
  where: {
    custom_id: 456
  }
};
const result = await this.app.mysql.update('posts', row, options); // 更新 posts 表中的记录

=> UPDATE `posts` SET `name` = 'fengmk2', `modifiedAt` = NOW() WHERE custom_id = 456 ;

// 判断更新成功
const updateSuccess = result.affectedRows === 1;
4)Delete
可以直接使用delete方法删除数据库记录
const result = await this.app.mysql.delete('posts', {
  author: 'fengmk2',
});

=> DELETE FROM `posts` WHERE `author` = 'fengmk2';
5)直接执行 sql 语句
使用 query 可以执行合法的 sql 语句。如果必须要自己拼接 sql 语句,请使用 mysql.escape 方法。
const postId = 1;
const results = await this.app.mysql.query('update posts set hits = (hits + ?) where id = ?', [1, postId]);

=> update posts set hits = (hits + 1) where id = 1;
九、应用部署
egg-scripts 来支持线上环境的运行和停止
- 安装
npm i egg-scripts --save
- 添加
npm scripts到package.json
{
  "scripts": {
    "start": "egg-scripts start --daemon",
    "stop": "egg-scripts stop"
  }
}
这样我们就可以通过 npm start 和 npm stop 命令启动或停止应用。
- 启动命令
egg-scripts start --daemon --title=egg-server-nodeneiying --ignore-stderr --env=dev
- `--port=7001 `端口号,如未传递将使用框架内置端口 7001。优先级最高

- `--daemon `是否允许在后台模式,无需 nohup。若使用 Docker 建议直接前台运行。

- `--env=dev `框架运行环境, 如未传递将使用框架内置环境 prod。

- `--title=egg-server-nodeneiying` 用于方便 ps 进程时 grep 用,默认为` egg-server-${appname}。`

- `--ignore-stderr` 忽略启动期的报错。
- 停止命令
egg-scripts stop --title=egg-server-nodeneiying
- 启动配置项
在 config.{env}.js 中配置指定启动配置。
// config/config.default.js

exports.cluster = {
  listen: {
    port: 7001,
    hostname: '127.0.0.1'
    path: ''
  },
};