
nodejs框架文档
eggjs文档:https://www.eggjs.org/zh-CN
框架代码地址:https://codeup.aliyun.com/5f009f6e6a575d7f23661045/frontend/nodejs-frame
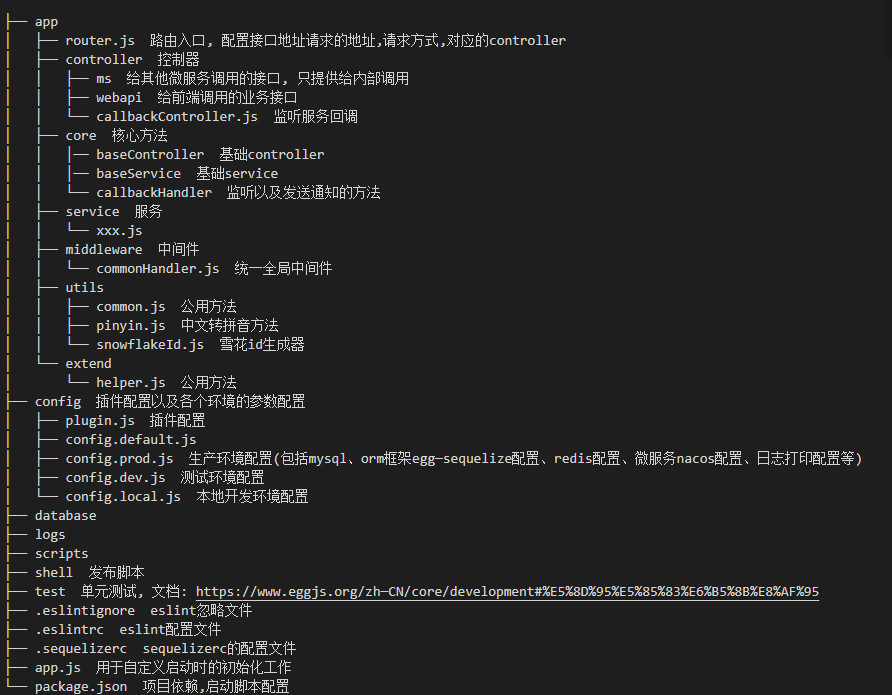
1、代码结构
├── app
│   ├── router.js  路由入口, 配置接口地址请求的地址,请求方式,对应的controller
│   ├── controller  控制器
│   │   ├── ms  给其他微服务调用的接口, 只提供给内部调用
│   │   ├── webapi  给前端调用的业务接口
│   │   └── callbackController.js  监听服务回调
│   ├── core  核心方法
│   │   │── baseController  基础controller
│   │   │── baseService  基础service
│   │   └── callbackHandler  监听以及发送通知的方法
│   ├── service  服务
│   │   └── xxx.js
│   ├── middleware  中间件
│   │   └── commonHandler.js  统一全局中间件
│   ├── utils
│   │   ├── common.js  公用方法
│   │   ├── pinyin.js  中文转拼音方法
│   │   └── snowflakeId.js  雪花id生成器
│   └── extend
│       └── helper.js  公用方法
├── config  插件配置以及各个环境的参数配置
│   ├── plugin.js  插件配置
│   ├── config.default.js
│   ├── config.prod.js  生产环境配置(包括mysql、orm框架egg─sequelize配置、redis配置、微服务nacos配置、日志打印配置等)
│   ├── config.dev.js  测试环境配置
│   └── config.local.js  本地开发环境配置
├── database
├── logs
├── scripts
├── shell  发布脚本
├── test  单元测试, 文档: https://www.eggjs.org/zh─CN/core/development#%E5%8D%95%E5%85%83%E6%B5%8B%E8%AF%95
├── .eslintignore  eslint忽略文件
├── .eslintrc  eslint配置文件
├── .sequelizerc  sequelizerc的配置文件
├── app.js  用于自定义启动时的初始化工作
└── package.json  项目依赖,启动脚本配置
2、配置信息
以 config/config.local.js 为例
(1)mysql 和 redis 配置
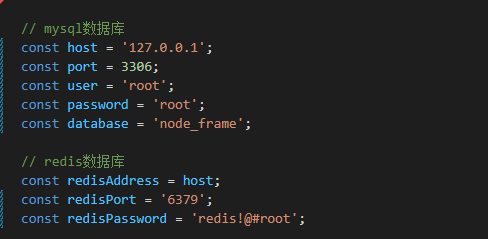
MySQL
数据库使用的是MySQL,这里不直接连接数据库,而是通过orm框架 egg-sequelize 来连接数据库。 使用该框架可以使数据库操作更简单。各项配置信息如下:
①需要在 config/plugin.js 中配置插件信息
module.exports = {

  ...
  sequelize: {
    enable: true,
    package: 'egg-sequelize',
  }
  ...
}
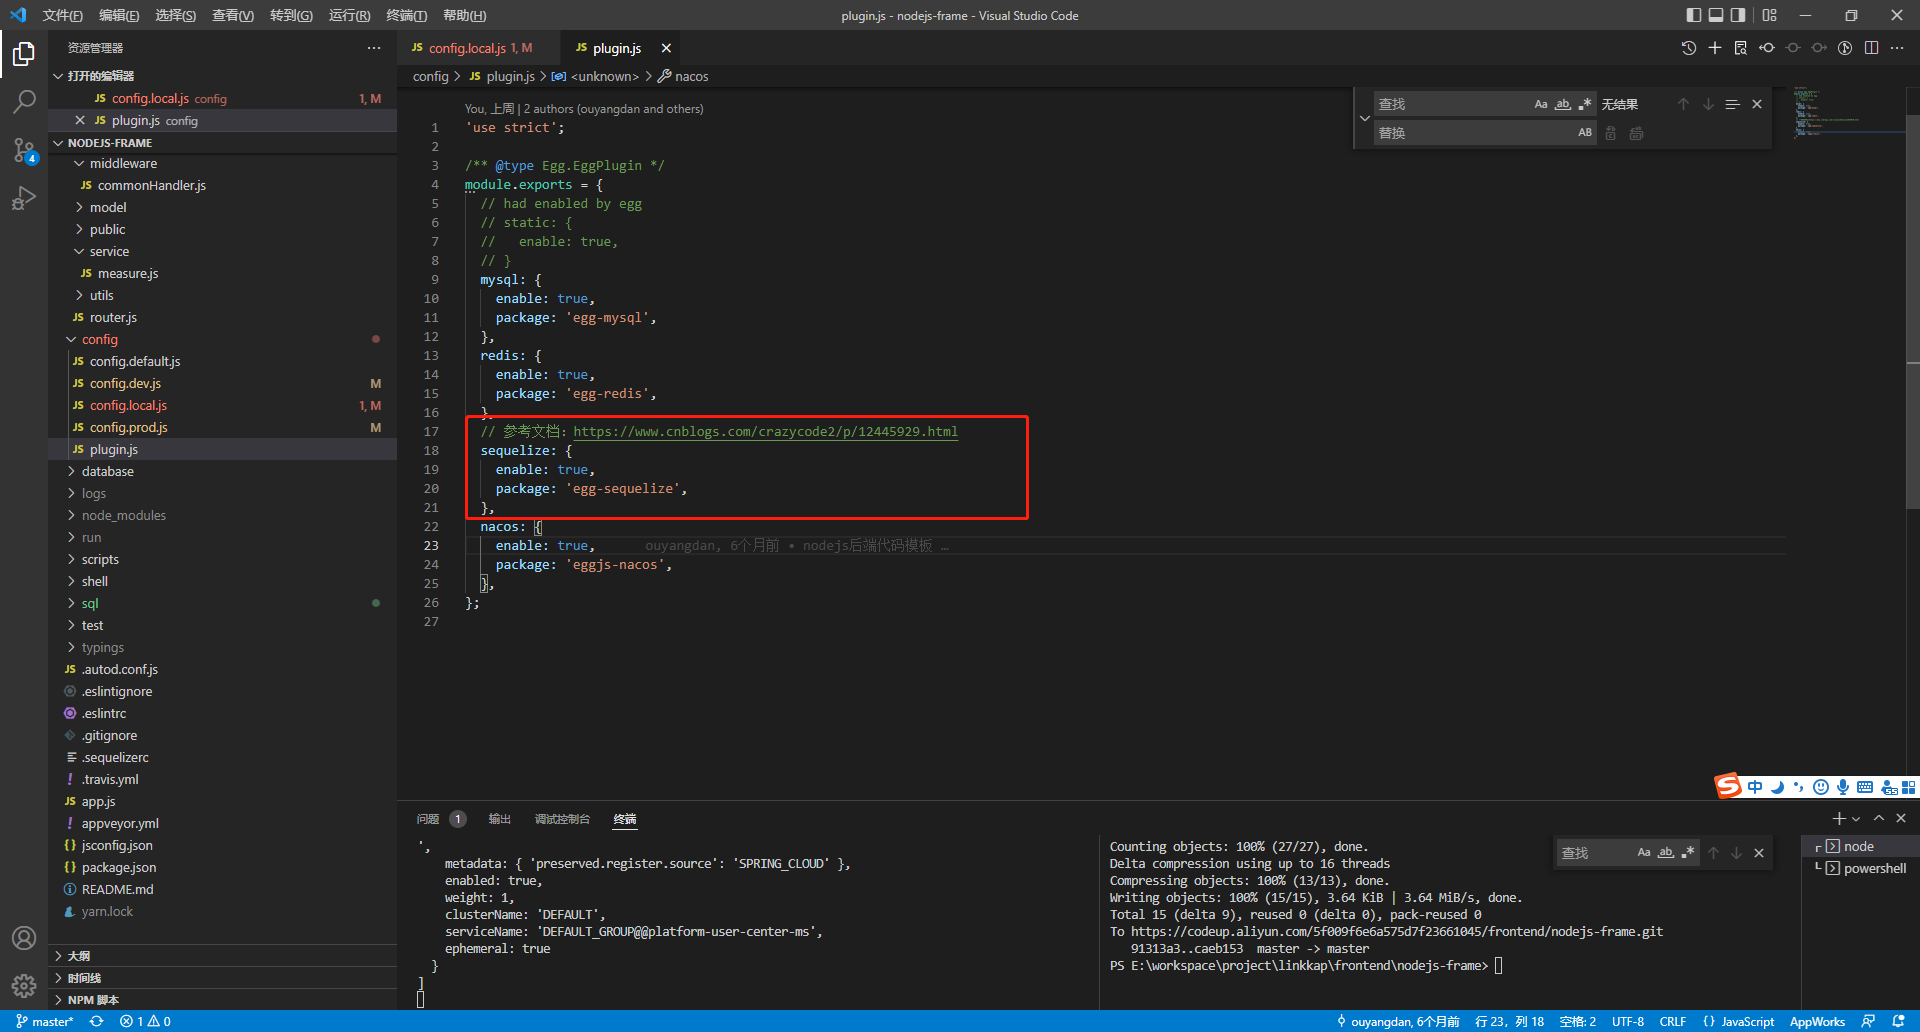
②在 config/config.local.js 中配置如下:
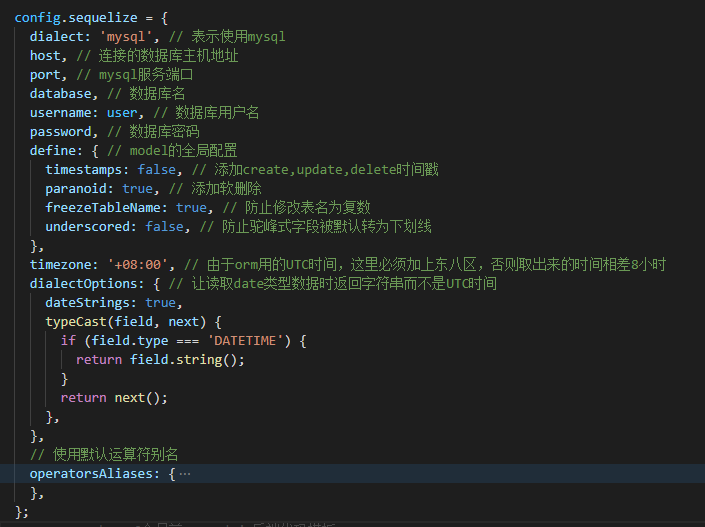
文档:https://www.eggjs.org/zh-CN/tutorials/sequelize
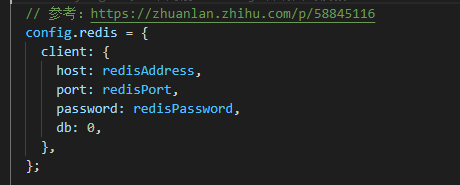
Redis
①需要在 config/plugin.js 中配置插件信息
module.exports = {

  ...
  redis: {
    enable: true,
    package: 'egg-redis',
  }
  ...
}
②在 config/config.local.js 中配置如下:
(2)日志
日志配置如下,其中 logPath 为日志的存放路径。目前生产环境设置为 /data/logs/nodejs 。
module.exports = {
  ...

  config.logger = {
    dir: logPath,
    formatter(meta) {
      if (meta.message.length > 2000) {
        meta.message = meta.message.substring(0, 2000) + '...';
      }
      return `${meta.date}  ${meta.level} - ${meta.message}`;
    },
    // ctx logger
    contextFormatter(meta) {
      if (meta.message.length > 2000) {
        meta.message = meta.message.substring(0, 2000) + '...';
      }
      return `${meta.date}  ${meta.level} - [${meta.ctx.request.header['x-request-id'] || '-'}] : ${meta.message}`;
    },
  };

  ...
}
formatter与 contextFormatter 方法配置日志格式化,一般情况下无需更改。默认日志格式为:
日期 日志等级 - [请求id] [文件名] 日志内容
日期 日志等级 - [请求id] [文件名] 接口地址 接口请求参数
部分日志内容:

日志打印:
配置好之后可以在 Controller 和 Service 里面使用 logger、app.logger、ctx.logger打印日志
ctx.logger.debug('debug info');
ctx.logger.info('some request data: %j', ctx.request.body);
ctx.logger.warn('WARNNING!!!!');
// 错误日志记录,直接会将错误日志完整堆栈信息记录下来,并且输出到 errorLog 中
// 为了保证异常可追踪,必须保证所有抛出的异常都是 Error 类型,因为只有 Error 类型才会带上堆栈信息,定位到问题。
ctx.logger.error(new Error('whoops'));
(3)微服务
使用 eggjs-nacos 插件
①需要在 config/plugin.js 中配置插件信息
module.exports = {

  ...
  nacos: {
    enable: true,
    env: [ 'dev', 'prod' ],
    package: 'eggjs-nacos',
  }
  ...
}
②在 config/config.local.js 中配置如下:
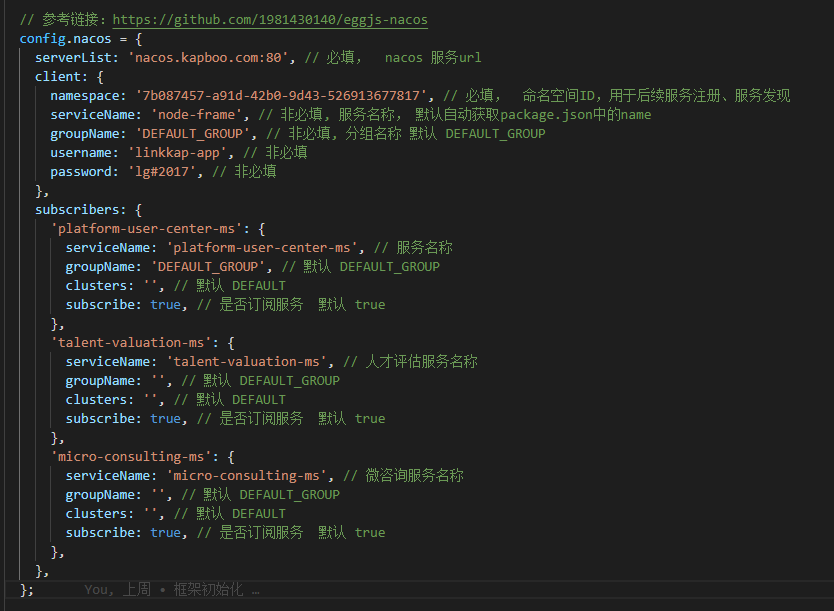
文档地址:https://github.com/1981430140/eggjs-nacos
无需使用微服务则无需添加此配置。
3、数据库
示例数据库文件在 sql 目录中,可以导入到本地数据库使用。
使用 sequelize 来访问数据库。
(1)初始化配置
① 在项目根目录创建一个 .sequelizerc 文件,指定各项配置读取路径
'use strict';

const path = require('path');

module.exports = {
  config: path.join(__dirname, 'database/config.json'),
  'migrations-path': path.join(__dirname, 'database/migrations'),
  'seeders-path': path.join(__dirname, 'database/seeders'),
  'models-path': path.join(__dirname, 'app/model'),
};
② 配置 config/plugin.js 以及 config/config.local.js
以上第二点已经提及,不再赘述。
③ 配置 数据库model相关内容
此项目使用 sequelize-auto插件根据连接的数据库自动生成model。自动生成的脚本是根目录下的script/autoModels.js此脚本在 package.json 中配置了前端安装依赖后会自动触发此脚本
autoModels.js
'use strict';

const SequelizeAuto = require('sequelize-auto');
const config = require('../config/config.local.js')({ name: '' });

const db = {
  database: config.sequelize.database,
  host: config.sequelize.host,
  port: config.sequelize.port,
  username: config.sequelize.username,
  password: config.sequelize.password,
  dialect: config.sequelize.dialect,
};
const auto = new SequelizeAuto(db.database, db.username, db.password, {
  host: db.host,
  dialect: db.dialect,
  directory: './database/model/', // prevents the program from writing to disk
  port: db.port,
  additional: {
    timestamps: false,
  },
  // tables: []  // 指定表格
  // ...
});

auto.run(function(err) {
  if (err) throw err;
});
(2)初始model
sequelize 是通过一个一个与数据库对应的model,来访问数据库的。我们需要先编写 model 才能通过 model 访问数据库。
我们可以通过 nodejs 的 fs 模块读取 database/model 来自动生成 model 文件。具体代码在 script/init.js
(3)使用
配置好 Model 后就可以在Controller 和 Service 中通过 app.model.Model名 或者 ctx.model.Model名 访问到了。可以通过这个model 进行数据库操作。
官网例子:
const Controller = require('egg').Controller;

function toInt(str) {
  if (typeof str === 'number') return str;
  if (!str) return str;
  return parseInt(str, 10) || 0;
}

class UserController extends Controller {
  async index() {
    const ctx = this.ctx;
    const query = {
      limit: toInt(ctx.query.limit),
      offset: toInt(ctx.query.offset),
    };
    ctx.body = await ctx.model.User.findAll(query);
  }

  async show() {
    const ctx = this.ctx;
    ctx.body = await ctx.model.User.findByPk(toInt(ctx.params.id));
  }

  async create() {
    const ctx = this.ctx;
    const { name, age } = ctx.request.body;
    const user = await ctx.model.User.create({ name, age });
    ctx.status = 201;
    ctx.body = user;
  }

  async update() {
    const ctx = this.ctx;
    const id = toInt(ctx.params.id);
    const user = await ctx.model.User.findByPk(id);
    if (!user) {
      ctx.status = 404;
      return;
    }

    const { name, age } = ctx.request.body;
    await user.update({ name, age });
    ctx.body = user;
  }

  async destroy() {
    const ctx = this.ctx;
    const id = toInt(ctx.params.id);
    const user = await ctx.model.User.findByPk(id);
    if (!user) {
      ctx.status = 404;
      return;
    }

    await user.destroy();
    ctx.status = 200;
  }
}

module.exports = UserController;
文档:https://www.eggjs.org/zh-CN/tutorials/sequelize
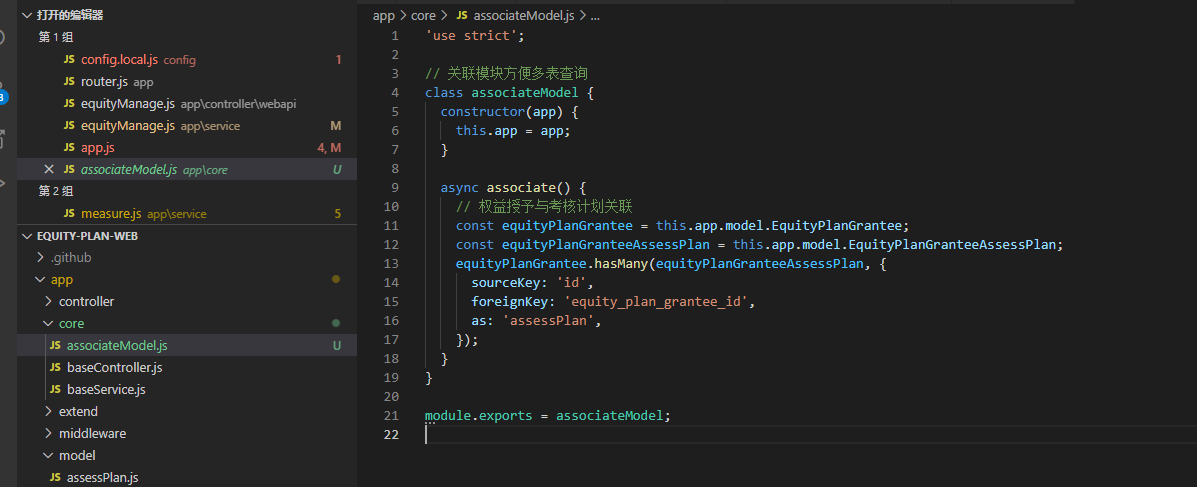
(4)多表查询
在我们实际使用中,数据可能存在多个表中,这时我们查询数据时需要关联多个表。例如:有A和B两个模型,且A 对 B是一对多的关系。需求是:查询出A并且列出与A相关的所有B
(1)关联 A 和 B 两个model
// 假设 B 表中, a_id字段与 A表的id 字段关联
const AModel = this.app.model.A;
const BModel = this.app.model.B;
AModel.hasMany(BModel, {
  sourceKey: 'id',
  foreignKey: 'a_id',
});
sequelize关联:https://www.sequelize.com.cn/core-concepts/assocs
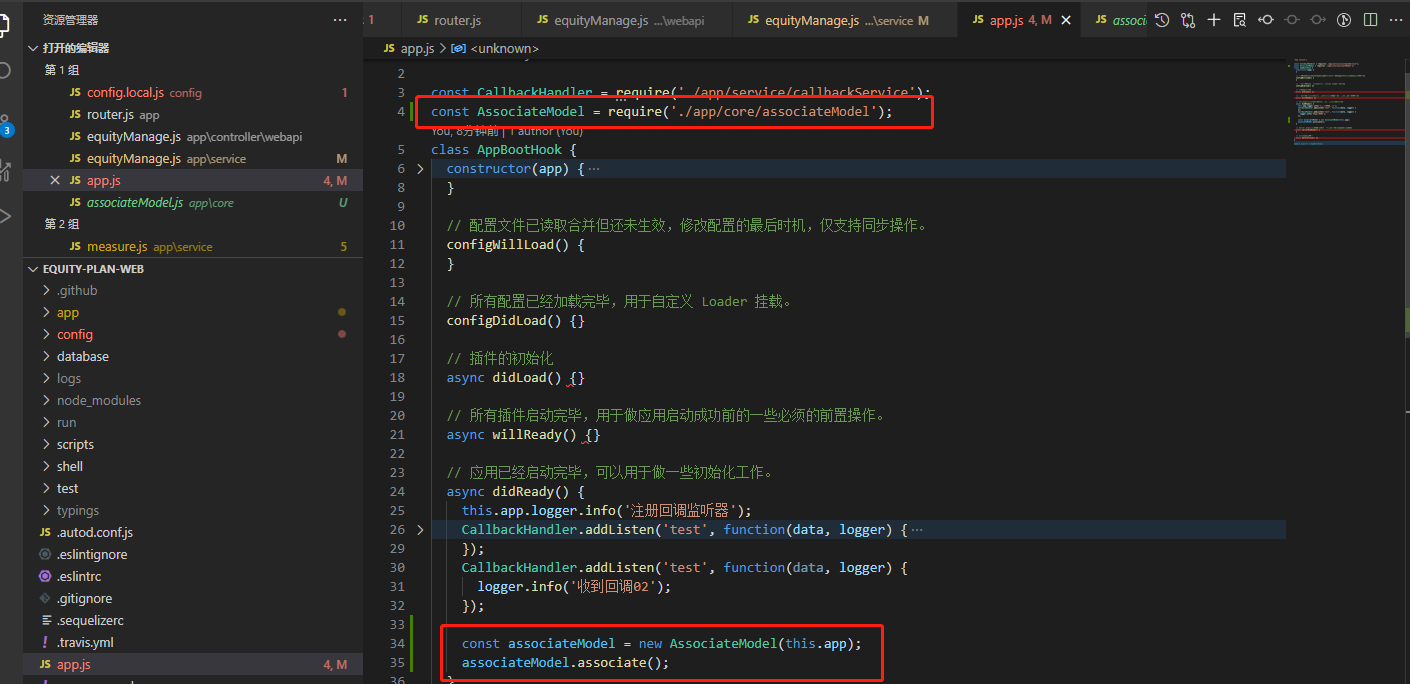
model 的关联只需要关联一次, 无需每次查询都进行关联, 所以把关联统一在 app/core/associateModel.js 中写关联的处理逻辑。并在 app.js 中进行初始化。
(2)使用 include 参数查询
查询时,对A进行查询, 然后include参数包含 B模型
const res = this.ctx.model.A.findAndCountAll({
  where: {
    del_flag: 0,
  },
  // 查询考核计划
  include: {
    model: this.app.model.B,
  },
  limit: Number(size),
  offset: (page - 1) * size,
});
4、微服务
(1)配置注册微服务
以上第二点中有描述微服务的配置
**说明:**本地服务通过 nacos 注册微服务后, 可能会导致线上服务调用到本地正在开发中的服务。 所以本地环境不注册微服务,直接通过curl调用其他第三方服务,可以配置直接调用某个域名
本地环境配置:
config.local.js
module.exports = appInfo => {
  config.nacos = {
    // 微服务名: 域名,
    'platform-user-center-ms': 'http://50100.ms.product.kapboo.com:8888',
  };
}
plugin.js
'use strict';

module.exports = {
  ...
  nacos: {
    enable: true,
    env: [ 'dev', 'prod' ],
    package: 'eggjs-nacos',
  },
  ...
};
(2)调用微服务
我们已经在 config.nacos 中的 subscribers 配置声明了我们需要调用的其他微服务。我们可以在Controller 和 Service 中使用 ctx.nacos['微服务别名'].request(url) 调用该微服务,此方法已经封装在 baseService 里面可以这样调用nacos('微服务名', url, options)
module.exports = appInfo => {
  config.nacos = {
    ...
    subscribers: {
      'platform-user-center-ms': {
        serviceName: 'platform-user-center-ms', // 服务名称
        groupName: 'DEFAULT_GROUP', // 默认 DEFAULT_GROUP
        clusters: '', // 默认 DEFAULT
        subscribe: true, // 是否订阅服务  默认 true
      }
    }
    ...
  };
}
例如以上我们配置订阅了微服务 platform-user-center-ms,调用微服务提供的“用户登录日志”接口:
'use strict';

const Service = require('../core/baseService');

class MeasureService extends Service {
  async fetchOtherService() {
    const res = await this.nacos('platform-user-center-ms', '/api/platform-user-center/platform/v1/user/login-log/list', {
      method: 'POST',
      dataType: 'json',
      headers: {
        'Content-Type': 'application/json',
      },
      data: {},
    });

    const data = res.data;
    this.logger.info('第三方服务返回的数据', JSON.stringify(data));
    if (data.code !== 200) throw new Error(data.message);
    return data.object;
  }
}

module.exports = MeasureService;
5、如何编写一个接口
(1)编写 Controller
根据接口的功能、模块新建Controller,(接口提供给微服务内部调用则放在 app/controller/ms,提供给前端调用的接口放在 app/controller/weiapi),例如创建一个供前端调用的查询接口:
'use strict';

const Controller = require('../../core/baseController');

class MeasureController extends Controller {


  // 搜索列表
  async search() {
    const { current, size, companyName, startTime, endTime } = this.ctx.request.query;
    const res = await this.ctx.service.measure.search({ current, size, companyName, startTime, endTime });
    return this.success(res);
  }

}
module.exports = MeasureController;
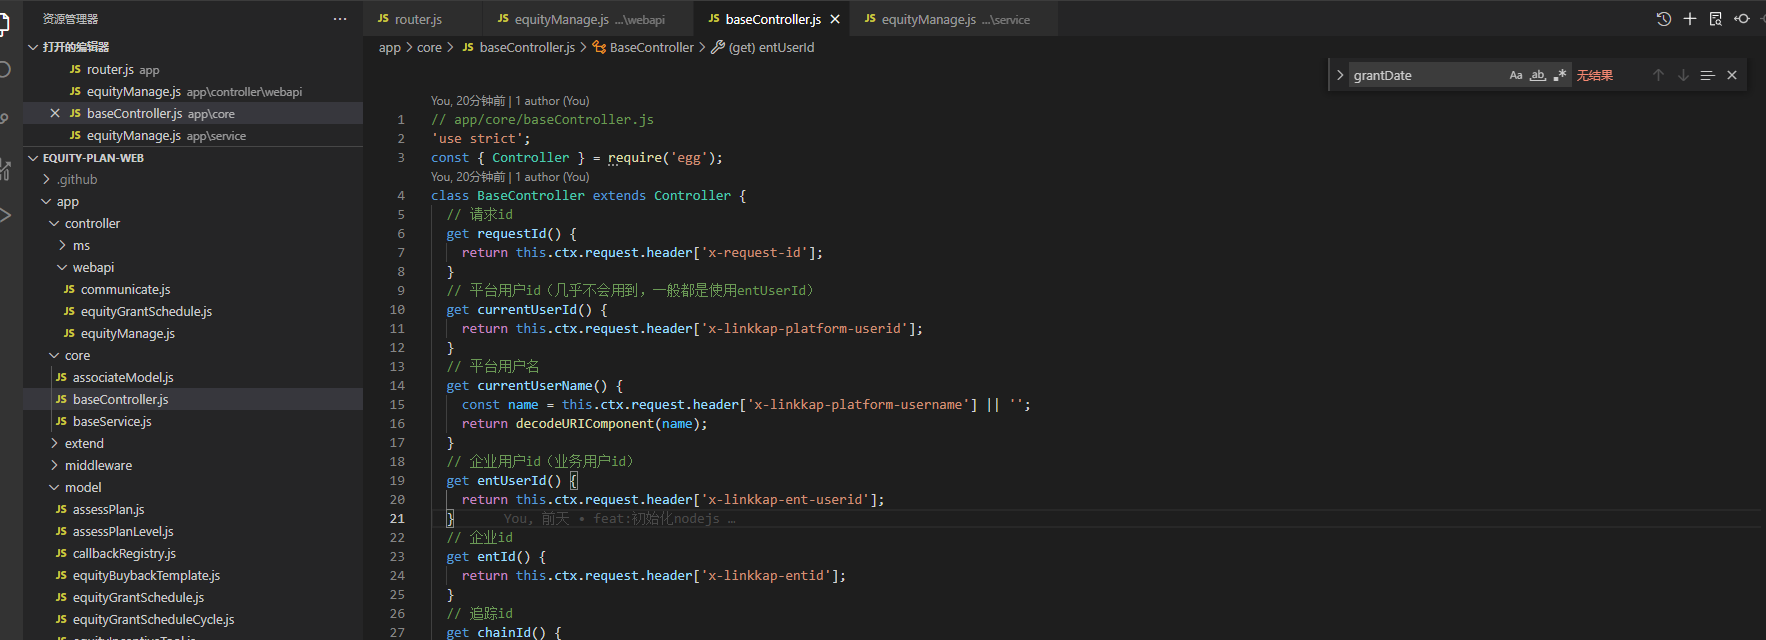
**注意:**Controller 需要继承 baseController (统一的 success 方法就来自于baseController)
(2)编写 Service
在service中编写接口逻辑。按功能模块区分好目录,在 app/service 创建对应的 service 文件
'use strict';

const Service = require('../core/baseService');

class MeasureService extends Service {
  /**
   * sequelize官方文档:https://sequelize.org/docs/v6/
   * @param {*} param0
   */
  async search({ current, size, companyName, startTime, endTime }) {
    const where = {};
    if (companyName) {
      where.company_name = { $like: `%${companyName}%` };
    }
    if (startTime && endTime) {
      where.$and = [
        { create_time: { $gte: `${startTime} 00:00:00` } },
        { create_time: { $lte: `${endTime} 23:59:59` } },
      ];
    }

    const res = await this.ctx.model.Measure.findAndCountAll({
      where,
      offset: (current - 1) * size,
      limit: Number(size),
    });
    // res格式为 { count: 0, rows: [] }
    return res;
  }

}

module.exports = MeasureService;
**注意:**Service需要继承 baseService
(3)配置 router
在 app/router.js 配置接口请求方式, 请求地址。
/*
 * @file: 路由配置
 */
'use strict';

/**
 * @param {Egg.Application} app - egg application
 */
module.exports = app => {
  const { router, controller } = app;
  router.get('/webapi/node-frame/v1/page', controller.webapi.measure.search);
};
若项目有需求可以把路由拆分在多个文件中,可参考官方文档处理。(eggjs官方并不建议这么做)
文档:https://www.eggjs.org/zh-CN/basics/router#太多路由映射
6、事务
事务是使用 sequelizerc 框架的transaction方法实现的,为了方便统一处理,在baseService中封装了 transaction() 方法用于事务操作。
使用事务进行多数据更新操作:
Controller
'use strict';

const Controller = require('../../core/baseController');
class MeasureController extends Controller {


  // 事务
  async transactionProcessing() {
    const res = await this.ctx.service.measure.transactionProcessing();
    return this.success(res);
  }

}
module.exports = MeasureController;
Service
// 其中callback 的返回值则是 this.transaction 的返回值.
await this.transaction(callback)
'use strict';

const Service = require('../core/baseService');

class MeasureService extends Service {

  // 事务
  async transactionProcessing() {
    const result = await this.transaction(async transaction => {
      const id = new Date().getTime();
      const res = await this.ctx.model.Measure.create({
        measure_id: id,
        measure_name: '测试事务',
      }, {
        transaction,
      });
      // 模拟失败的情况
      // await this.ctx.model.Measure.create({
      //   measure_id: id,
      //   measure_name: '测试事务',
      // }, {
      //   transaction,
      // });
      // 模拟失败的情况

      return res;
    });
    return result;
  }

}

module.exports = MeasureService;
使用 this.transaction 方法创建一个事务。需要把回调方法中返回的事务对象 transaction ,写入每个数据库操作中。
7、与旧版框架的差异
(1)微服务
使用了 eggjs-nacos插件实现微服务的调用,若无需使用微服务。可去除以下配置,或者把 enable 改为 false
config/plugin.js
module.exports = {

 ...
  nacos: {
    enable: true,
    package: 'eggjs-nacos',
  },
  ...
}
config/config.local.js
module.exports = appInfo => {
  config.nacos = {
    ...
  }
}
(2) 日志
在 config/config.local.js 配置了统一的日志格式,输出目录等。
(3)middleware中间件统一逻辑修改
(4)controller 目录分层
(5)数据库使用 sequelizerc 访问
此改动与原框架差别较大,框架迁移时需要注意。原框架使用 egg-mysql 直接访问数据库,迁移到新框架之后访问数据库的方法需要对应改成 egg-sequelize 访问数据库的方法
例如:
egg-mysql(原框架) curd 方法
// 插入
const result = await this.app.mysql.insert('posts', { title: 'Hello World' }); // 在 post 表中,插入 title 为 Hello World 的记录

// 更新
const row = {
  id: 123,
  name: 'fengmk2',
  otherField: 'other field value',    // any other fields u want to update
  modifiedAt: this.app.mysql.literals.now, // `now()` on db server
};
const result = await this.app.mysql.update('posts', row); // 更新 posts 表中的记录

// 查询
const results = await this.app.mysql.select('posts', { // 搜索 post 表
  where: { status: 'draft', author: ['author1', 'author2'] }, // WHERE 条件
  columns: ['author', 'title'], // 要查询的表字段
  orders: [['created_at','desc'], ['id','desc']], // 排序方式
  limit: 10, // 返回数据量
  offset: 0, // 数据偏移量
});

// 删除
const result = await this.app.mysql.delete('posts', {
  author: 'fengmk2',
});
egg-sequelize(新框架)的curd可以参考此文档的 3.3
官网文档对比:
egg-mysql: https://www.eggjs.org/zh-CN/tutorials/mysql#create
egg-sequelize:https://www.eggjs.org/zh-CN/tutorials/sequelize
(6)网关
网关:https://codeup.aliyun.com/5f009f6e6a575d7f23661045/product/backend/gateway
接口需要经过网关之后再到服务。请求进入网关后, 网关根据请求模块类型进行分发,分发前会把当前请求的用户信息、企业信息加入请求头,再分发到各个服务。可以在request.header 中获取到相关信息。
baseController 和 baseService 中已经封装了相应的方法。
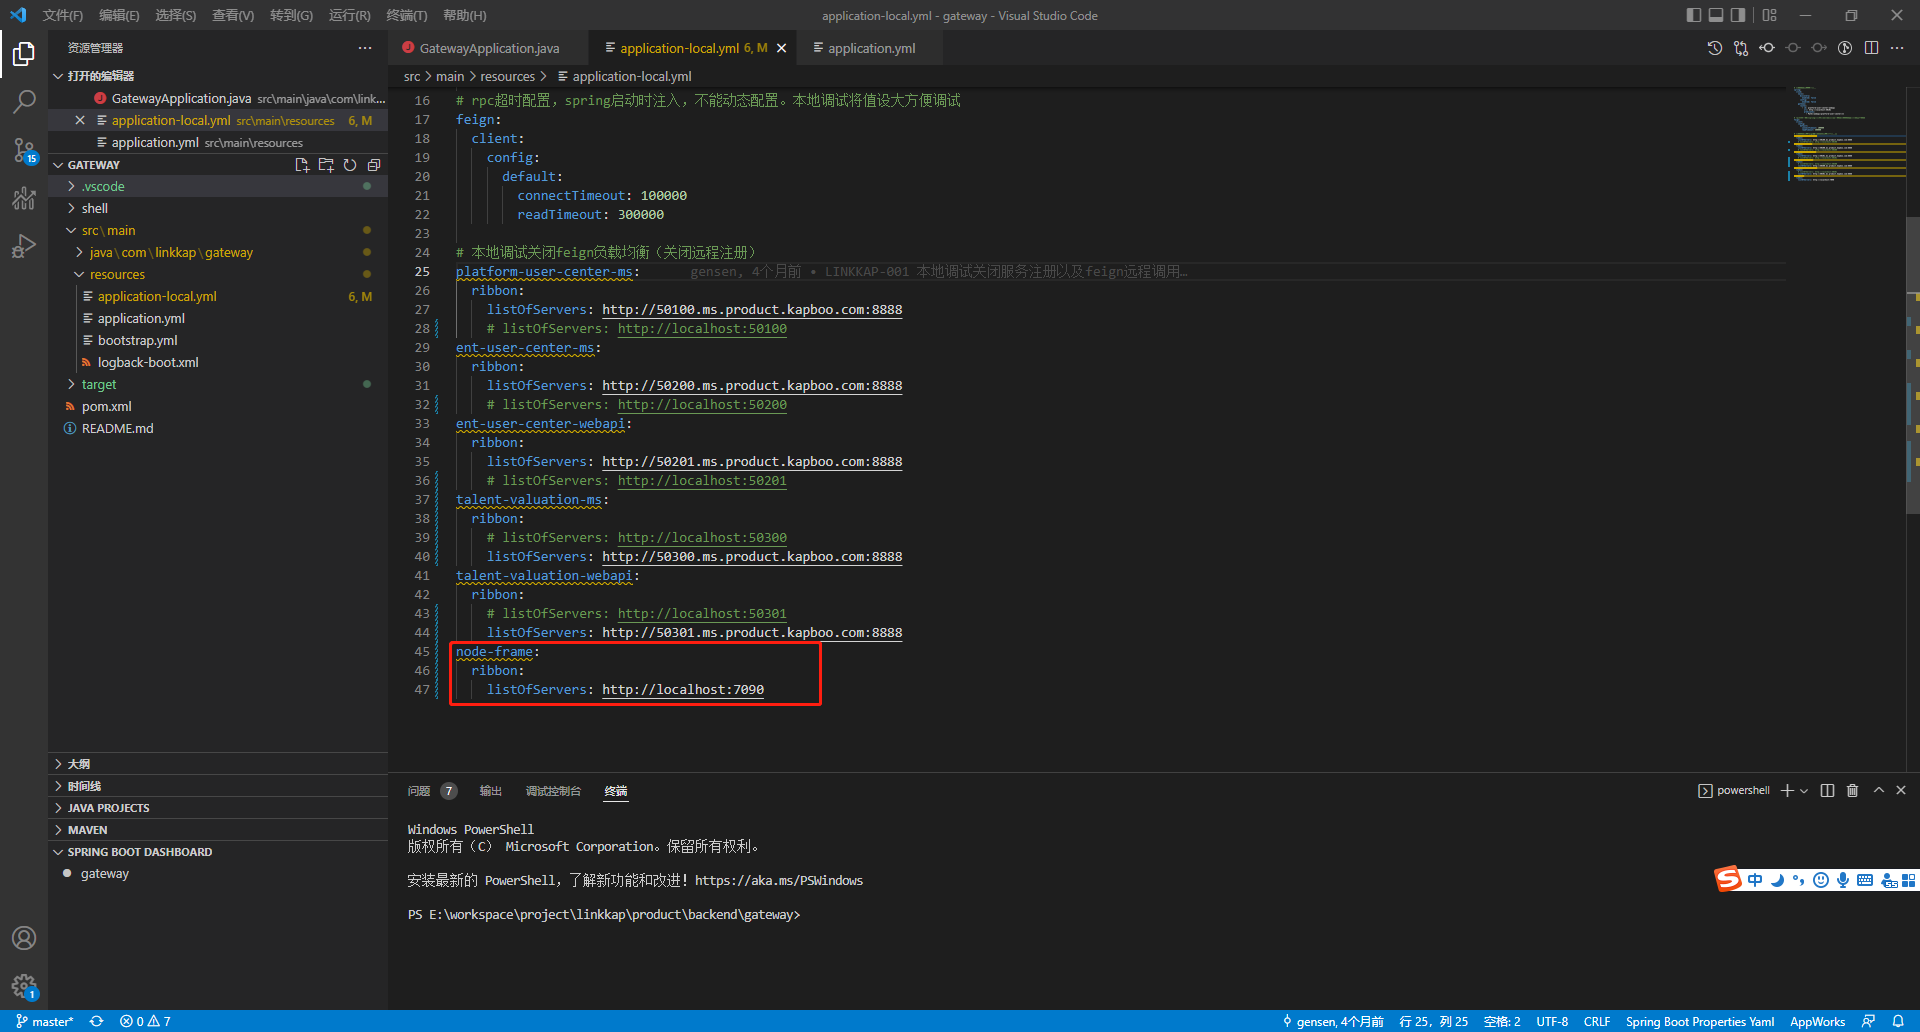
网关配置:
在 application-local.yml 中配置对应项目的微服务名, 请求域名。运行服务即可
会议录制
主题 :nodejs微前端框架介绍